Hackintosh OS X 10.9 Mavericks dual boot with Windows 10 Pro
I use a late 2013 Retina Macbook Pro as my main computer. I've an another desktop computer with pretty good specs. I thought making it a hackintosh because I love the stability of OS X with the unix terminal. Its really awesome when you're a developer.
Since I do occasional gaming I'm going to dual boot OS X 10.9 and Windows 10 Pro.
The reason I chose OS X Mavericks over Yosemite and El capitan to my hackintosh, I'm gonna run latest version of OS X on my MBPr anyway, so I don't want to have same OS on both computers. And Finally I like the OS X Mavericks and previous OS X aqua feeling with that Menlo font. That all personal preference btw :)
 |
| My Late 2013 Retina Macbook Pro + Windows 10 running PC |
- Intel Core i7 3770K overclocked to 4.5GHz (1.23v)
- 16GB DDR3 1600MHz GSkill RipjawasX RAM (8GBx2)
- 1TB Toshiba mk1002tskb 7200rpm Enterprise grade Hard Drive
- 2GB EVGA GT640 VGA Card ( I know pretty shit low end card :D )
- Asus P8Z77-V Motherboard
- Corsair H100i Watercooling system
- InWin 750W Bronze PSU
- InWin Dragon Rider Case
- Asus DVD RW Drive
- Logitech 720p HD Web Cam
- Atech Multimedia Headset
- Powerlogic Multimedia Combo ( Keyboard + Mouse )
Lets get to work !!!
First you need a OS X running computer to build a OS X bootable pen drive.
If you don't have a Mac you can always use a virtual machine running OS X to build the OS X bootable stick.
I'm gonna use my MBP to build the bootable stick.
You need at least 8GB or + USB drive to create the bootable USB stick. since I lost my pen drive recently :D I'm gonna use my old Nokia E7 16GB as my pen drive :D
Go to the Mac App store and download the legal copy of OS X
I'll show in /Application folder in your Mac
 |
| OS X Mavericks Installation on Application folder |
Then download latest UniBeast and MultiBeast for Mavericks from tonyMacx86 download section
 |
| TonyMacX86 downloads |
Then plug the USB stick and open Disk utility on your mac ( Spotlight search: Disk Utility )
Select your USB stick in disk utility and click Partition tab
Partition layout - 1 Partition
Click Options and GUID Partition Method
Format Mac OS Extended (Journaled)
Type Name as USB
Click Apply and Partition
After completing the partitioning
Open UniBeast and following the steps ( 1 to 4 )
 |
| 1. Select your USB here |
 |
| 2. Select Mavericks |
 |
| 3. Select both Laptop Support and Legacy USB Support |
 |
| 4. Click Finish It will create OS X bootable Pen Drive |
Creating the bootable OS X USB stick will take some time depending on your USB stick.
After creating the bootable USB stick. backup your all the necessary data to a external Hard drive
We are going to do a full format your whole hard drive.
Restart your PC and go to BIOS
set to XMP Profile to Profile 1 (Optional)
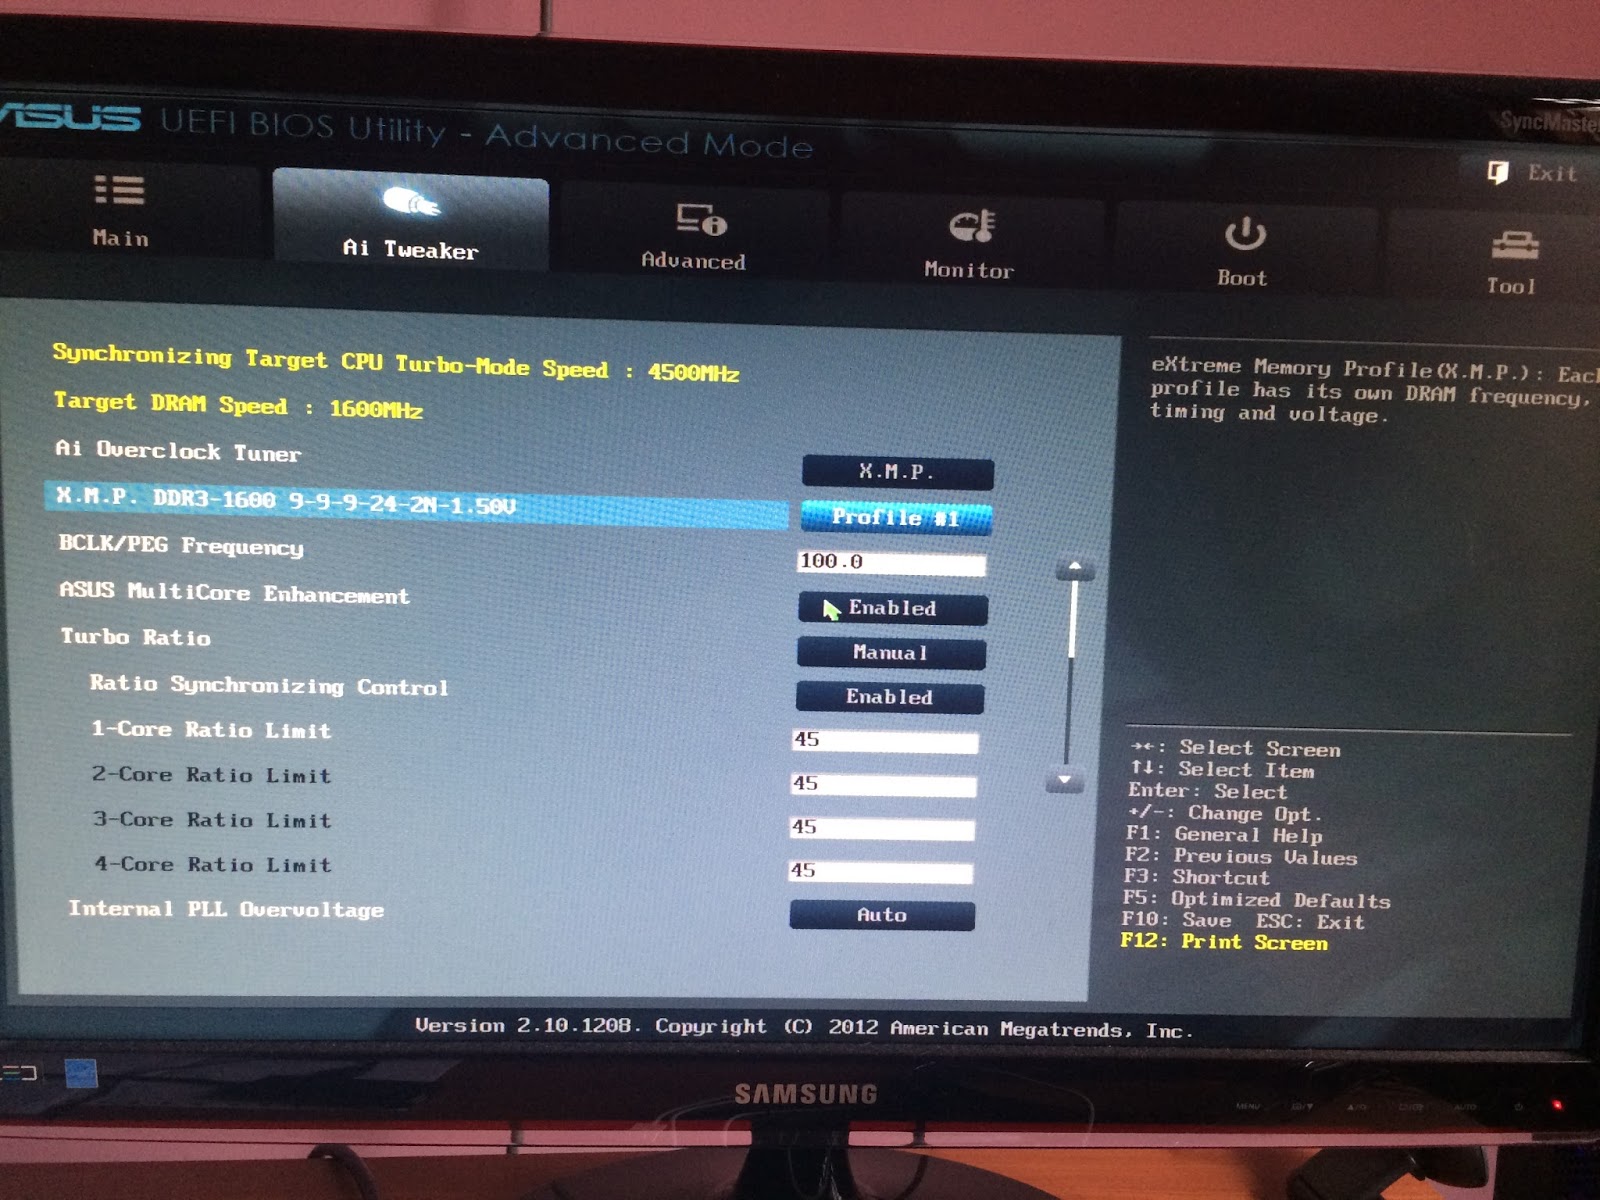 |
| Select XMP Profile to Profile 1 |
Disable Intel VT-d (Virtualization) on BIOS
 |
| Disable Intel VT-D |
Save the changes and boot the Computer using OS X bootable stick (In my case my old phone :D)
 |
| Choose the Bootable OS X stick to boot |
Select USB to boot (Pen Drive Name)
 |
| Select USB to boot |
After little while you'll get a screen like below
 |
| OS X Installation |
If you have trouble reaching the installer, type -x at the Boot screen
You can type the boot flags GraphicsEnabler=Yes, maxmem=4096, PCIRootUID=1, PCIRootUID=0, andnpci=0x2000 by themselves or together in order to solve boot issues for older graphics cards and machines.
Type -v to bypass the Apple boot screen and enter verbose startup mode.
If you're PC booting correctly to the OS X installer lets partition the hard drive to install OS X & Windows 10 Pro
Go to the Disk Utility on OS X Installer
 |
| Go to the Disk Utility |
Select your Hard Drive or SSD
Since I'm using a single hard drive. I'm going to create 2 partitions
500GB Partition for OS X & Another 500GB Partition for Windows 10
Select 1st partition and select format as Mac OS Extended (Journaled)
Select 2nd partition and select format as Fat
Click Options and select GUID Partition Method
And click Apply
 |
| Partitioning the Disk to boot OS X and Windows 10 |
And click Partition
 |
| Partition the Disk |
After partitioning close the disk utility, Click Continue and select the partition to install OS X
 |
| Select the partition to install OS X |
Click Install to install OS X to the hard disk
 |
| Installing OS X on Hard Disk |
Now It'll take some time to install OS X to the hard disk.
After installing the OS X, Restart the computer and choose to boot from the
 |
| Select OS X partition to boot the OS X |
Then you can see OS X loading from the Hard Disk
 |
| OS X loading from the Hard Disk |
 |
| After that You'll get to this screen |
Click Continue
 |
| Create an OS X User Account |
 |
| Setting up the Account |
 |
| Finally came to the OS X desktop |
Now Restart the Computer.
Now its time to Install Windows 10 Pro on the 2nd Partition
Boot the PC from your Windows 10 Pro bootable DVD
 |
| Booting Windows 10 from bootable DVD |
 |
| Windows 10 installation process |
Make sure only to format the partition we created for Windows 10 from the OS X disk utility
 |
| Formatting the partition reserved for Windows 10 |
 |
| Installing Windows 10 |
 |
| Windows 10 Successfully installed |
Now restart the computer and use the OS X bootable pen drive to boot to the installed OS X on the hard drive. If you didn't use the bootable pen drive computer will directly boot into Windows 10.
So boot use the OS X boot stick and boot to the OS X copy installed in Hard Disk
the next thing you've to do is install necessary kext (kernel extension) files and boot loader.
First Go to System Preferences -> Security & Privacy and enable install Apps from Anywhere
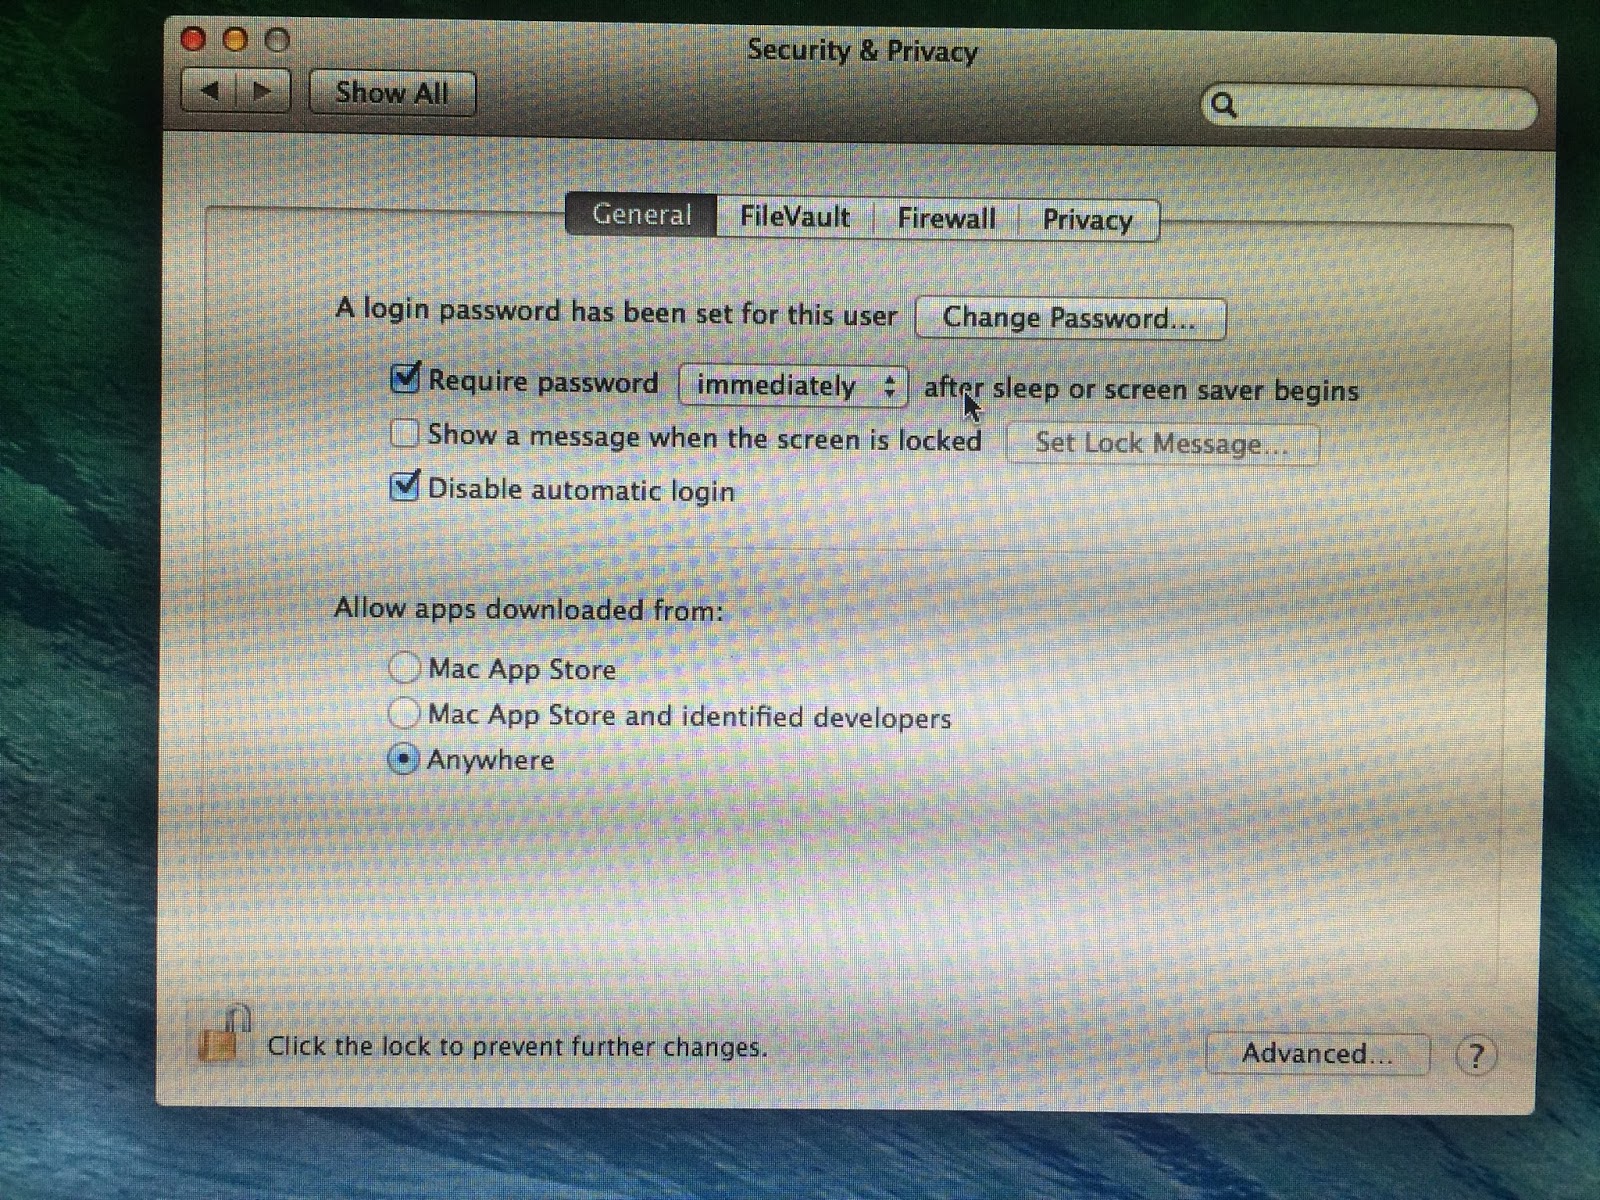 |
| Allow Apps from Anywhere to install kexts |
Open the MultiBeast
 |
| MultiBeast |
 |
| Select EasyBeast from the MultiBeast |
 |
| Select Necessary kexts according to your motherboard |
 |
| Installing Kexts |
After Installing all the Kernel Extensions restart your PC.
 |
| Chimera Bootloader |
When you see the Chimera bootloader everything installed correctly. If you didn't do anything at this point. The hackintosh will automatically boot into the OS X. If you click any key at this point you'll get to choose the OS you want to boot as below.
 |
| Select OS X or Windows |
Now Install All the necessary applications on OS X and on Windows 10.
Enjoy Your Hackintosh !!!
 |
| Success !!! |
 |
| Hackintosh Specs |
In this hackintosh almost everything works except
- Asus Internal Wi-Fi
If you want to have wifi in your build I suggest you to buy OS X compatible Wi-Fi card
(TP-LINK TL-WDN4800 Dual Band Wireless N900 PCI Express) is fully compatible with OS X.
- Power management ( Sleep )
This can be fixed using BIOS flashing refer tonymacX86 web site to more information
-Corsair Link
Corsair Link software is not working with OS X.
-Corsair Link
Corsair Link software is not working with OS X.
Tips for new Hackintosh builders
If you're building a new machine just to build a Hackintosh do the research before you buy parts.
some hardware parts are not working correctly with OS X.
Most suitable hardware list can be found here >> Hackintosh New Build Guide

great mchan. (y)
ReplyDeleteThank you :)
Deleteplz help me
DeleteI get problem during windows installation saying "windows cant be installed on gpt partition", as gpt was the partition style made to hard disk during mac os installation. I'm unable to install windows plz help. thanks in advance
ReplyDeleteI'm able to install either windows or mac.... plz help
ReplyDeleteThis comment has been removed by the author.
ReplyDeleteafter dualboot i shrink windows 10 partition and get unlocated space but new volume is not created
ReplyDeleteWorth reading. Keep it up☺️
ReplyDelete